Cauliflower and cannellini soup

October 23rd, 2008

DSC02260

Hurray! Its cauliflower time of the year. I’ve resisted the urge to douse it in cheese sauce and made soup instead

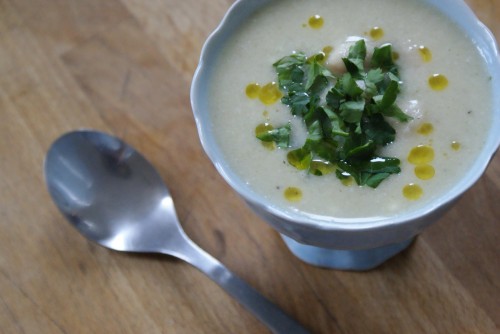
Thankfully, it turned out superbly. Cauliflower is so creamy when blended and a bit of extra texture from the beans and a lovely fragrance from the rosemary is all it needs. A perfect autumn meal, I was also lucky enough to have chunks of delicious homemade rye bread to dunk in. Surely the best part of soup?

Ingredients

serves 4

serves 4

50g butter
1 onion, peeled and roughly chopped
1 large sprig rosemary, leaves only
1 large cauliflower, approx 1kg, outer leaves removed
1.5 litres vegetable stock
4-6 tbsp double cream
2 cans cannellini bean, drained and rinsed
small handful parsley, chopped
olive oil

  • Melt the butter in a large saucepan and sweat the onions and rosemary for 5 minutes, or until the onions are softened.
  • Meanwhile, chop the cauliflower into small florets and add them to the pan. Stir until well coated in the butter and fry for a couple of minutes.
  • Pour over the stock and bring to the boil. Reduce the heat and simmer for 15 minutes, or until the cauliflower is completely soft.
  • Remove the pan from the heat and blend the soup with s tick blender until smooth.
  • Stir in the double cream and cannellini beans and warm through. Season with salt and pepper.
  • To serve, ladle the soup into bowls, drizzle with olive oil and sprinkle over the parsley.
Bookmark and Share

Throw it in Spicy Soup

October 21st, 2008

DSC00285
This is one for using up any vegetables languishing in the bottom of the fridge. Save them from the compost and make soup! Now that the weather is turning, its the perfect time for a warm bowl of comforting soup. Soup is possibly the easiest thing to make with the least output for maximum pleasure. What’s better that a steaming bowl of homemade soup?

Now, most soups require time, not that they’re difficult, you just need to leave a pan to putter away on a stove top for a while, ideally eating it the next day once the flavours have developed. Don’t get me wrong, this is fabulous for cooking in advance so that you can come home to dinner already made, or freeze portions ahead, for that, try these recipes.

This soup is all about knocking up a batch in 20mins flat and having endless variations, when you can’t think what to make to make for dinner, but you want to feel like you’re eating something ‘homemade’.

This is barely a recipe, simply fry a tablespoon or two, depending on how hot you like it of thai curry paste in a large pan until the heady fragrance are released. now throw in your vegetables, whatever you’ve got, think stir fry, you want everything sliced or finely chopped. Give them a stir until they start to catch. Now add a can of coconut milk, fill the empty can with water and add this too, maybe a little bouillon powder too to boost flavours. Let this simmer happily for 5mins or so. To bulk it out, add a couple of nests of noodles, perhaps adding some extra water, make you stir well and untangle them as they soften.

Try chickpeas, noodles, tofu, shredded roast chicken, sweetcorn, carrot, mushrooms, greens, chunks of salmon, bean sprouts… the list goes on. then you get to garnish, a squeeze of lime, a flutter of coriander leaves, sliced spring onions….

Bookmark and Share

Couscous Salad

October 20th, 2008

DSC00351
I went camping this weekend, no ordinary camping, to a tipi! Camping trips always conjure up thoughts of lovely local shops selling lovely local food and cosy pubs with lovely warm fires. In reality, depending where you are, it can be hard to find a good pub and even harder to find one with good food. So, as we arrived late on Friday and wanted to make the most of our tipi, I planned ahead. Out came some sausages from the freezer, some homemade bread, leftover haloumi and… busy trying to use as much things from the fridge that were on the turn as possible, I decided on couscous, the perfect snack for the journey.

In reality of course, the campsite was brilliant (another winner from The Cool Camping Guide), with a delightful cafe on site, selling delicious breakfast and several pubs all within walking distant selling grat pub food, mostly mussels, which were literally caught over the road. Still… being the country, by the time we arrived on Friday, nowhere was selling food so I glad of my pack lunch (and the bottle of wine I thought to pack).

tipi
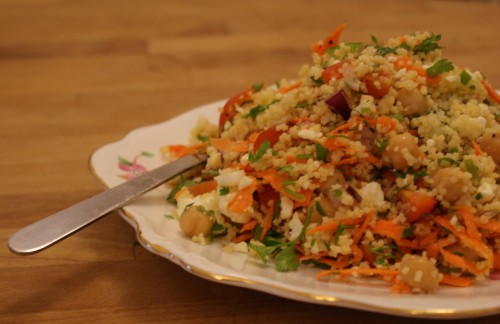
I love couscous, its such a pleasing vehicle for so many things – roasted carrots, smoked mackerel and brocolli. I like it fresh and zingy as below with feta, parsley and lots of lemon juice, or with roasted vegetables and flaked almonds. The recipe below is obviously just a starting point, use whatever you have handy – peppers always nice, as are olives, anything you’d put into a salad really… Hummus is another great partner, or some leaves packed into the top of the box so they don’t get soggy.

Serves 2

150g couscous
225ml hot vegetable stock
1/2 can chickpeas
200g cherry tomatoes, halved
1/4 cucumber, cut in half, the middle scooped out and sliced
100g feta, crumbled
1 medium carrot, grated
bunch parsley(and some mint too if you have it), chopped
juice 1/2 lemon
3tbsp olive oil
1/2 red onion, diced
1 small clove garlic, finely chopped
1 small handful toasted sunflower seeds or pine nuts

This is really just an assembly job…

  • wiegh the couscous out in a large bowl, pour over the hot stock, cover a with a large plate and leave to steep for about 5mins.
  • Once all the stock has been absorbed, fluff up using a fork. Pile all the ingredients into the bowl and mix thoroughly.
  • Squeeze the lemon juice over and pour in the olive. Mix really well and taste, it’ll probably need some salt and pepper.

Bookmark and Share

Sausage carbonara

October 17th, 2008

DSC00139
I have a lot of Jamie Oliver books, they make good reading, but haven’t actually cooked that many of his recipes, he’s all about using amazing (expensive) ingredients simply, when I’m often not. That said, you can’t really fault him, he does make beautiful food and on his Ministry of Food website, he’s some delicious looking basic recipes too. I’m also mildly obsessed with his website, In this case, I found this rather decadent pasta dish that looked pretty simple, being a glutton in general, I always defualt to creamy pasta dishes as opposed to tomate-ey ones…

Jamie’s Italian credentials are pretty good too, having worked at the River Cafe, with Gennaro Contaldo and travelling around Italy to write his book – Jamie’s Italy, I’m always keen to try his pasta recipes.

This is a classic carbonara in that it uses eggs as the base, they are tossed with the hot cooked pasta, golden crispy sausage and bacon, and cooked gently to form a smooth and silky sauce. The emphasis being on gentle otherwise you’ll end up with scrambled egg. Some lemon zest and parsley add freshness and cut through the richness of the sauce. Delicious and simple.

Recipe

Bookmark and Share

Kale and Mushroom Stir fry

October 15th, 2008

DSC00312

I was pretty excited when I saw the dark green leaves bursting out of the top of my vegetable box this week, but then quickly I was lost. I felt like kale would be delicious but what to do with it? I’ve already made this, delicious by the way, but I wanted something else… Internet searching proved fruitless, so I changed tactic and figured that kale is really just a winter green so searched for ‘greens’ recipes. Many were a take on stir fry and I soon had my heat set on a big bowl of intensely flavoured stir fry on some steaming white rice.

I had planned on using oyster sauce, but checking the list of ingredients on a bottle in the supermarket, I decided to do my own thing. A simple stir fry, using mushrooms for a bit of oomph (I didn’t want to just eat a plate of greens!) and some toasted cashews nuts for crunch.

Ingredients
Serves 2 generously

3 cloves garlic, finely chopped
1 chilli, finely chopped
1tbsp ginger, grated
250g mushrooms, sliced
100g kale, tough stalks removed and finely sliced
1 carrots, sliced lengthways and sliced
100g cashews
½ cup vegetable stock
3tbsp soy sauce
2tbsp sesame oil
Rice to serve

  • Stirfrys are all about preparation, so sharpen you knife and make sure everything is ready beforehand.
  • Heat a wok or large saucepan, toss in the cashews and move them around until golden and toasty. Remove.
  • Continue heating the wok as hot as you can bear, glug in a little sunflower oil (or vegetable) and heat until smoking.
  • Throw in the garlic, chilli and ginger, stirring frantically for a minute.
  • Next add the mushrooms and carrots and fry hard for a few mins until starting to brown around the edges.
  • Next add the kale, stir around and pour in the stock watching the pan spit and splutter, allow to bubble away for a few mins until the kale is cooked through and the stock reduced.
  • Next stir in the sesame oil and soy sauce. Taste and add more of each to if you prefer.
  • Serve with the rice and sprinkle over the cashew nuts.

Bookmark and Share

Damp Chocolate Cake

October 14th, 2008

CIMG1695
Another treat from How to Be a Domestic Goddess this is a simple plain loaf cake. That’s not to say it isn’t incredibly damp, intense and worryingly moreish. This is perfect on its own with tea or coffee or made more elaborate with the addition of some berries and ice cream or custard. Nigella confesses to liking it spread with cream chees, hmm will have to try that one out…

As its so moist, this cake keep like a dream, just make sure you line the tin well, or get some liners. It also improves after a day or so, perfect to make in advance.

Ingredients

225g soft butter
375g dark muscavado sugar
2 large eggs
1tsp vanilla
100g dark chocolate, melted
200g plain flour
1tsp bicarbonate of soda, added to the flour
250ml boiling water

  • Preheat the oven to 190C and line your loaf tin.
  • Cream the butter and sugar together, then add the eggs and vanilla, beating in well.
  • Next pour in the chocolate and mix this in well too.
  • Add half the flour to the batter and stir well, now add half the water and stir carefully until fully combined. Repeat with he rest of the flour and water.
  • Be patient stirring the batter as you will end up with a very liquid consistency. Now decant into the loaf tin, don’t be alarmed if it fills the tin almost to the top, the cake barely rises on cooking.
  • Bake for 30mins, then turn the oven down and bake for another 15mins.
  • Bear in mind a cake tester won’t come out completely clean as the cake is so squidgy, it will also tend to sink a little in the middle for the same reason.
  • Once cooked, remove from the tin and allow to cool.
Bookmark and Share

Potato Bread

October 11th, 2008

DSC00047

We’ve been making our own bread recently, not even with a breadmaker (which I happen to have tucked away in some dark corner), just old fashioned mixing in a bowl, a bit of kneading, some proving here a spot of baking there and you’re left with a delicious loaf of bread. And believe me, it is delicious, worth the (minimal) faffing it involves.

Although it doesn’t exactly take long, its realistic that this would be more of weekend activity, in which case, double up and freeze half so you have lovely homemade bread all the time.

So, this is our current favourite. Potato bread From How to be a Domestic Goddess, almost sourdough like tanginess, a chewy crust and the most incredible toast. I had this freshly baked on the morning of my birthday, a suitably decadent way to start the day I think.

DSC000551

Potato Bread (from How to be a Domestic Goddess)

Ingredients
300g cold or warm boiled potatoes
700-800g strong white flour
1tbsp salt
1 sachet easy-blend yeast
1tbsp yoghurt
300ml tepid potato water (water the potatoes were cooked in)

  • Rice (or mash) the potatoes into a large bowl and add 600g flour, the salt and yeast.
  • Mix together, add the yoghurt and potato water slowly until you have something resembling a dough.
  • Tip this out onto a surface and knead, add the rest of the flour slowly. This will be a rather damp and sticky dough so be prepared to knead for about 10mins.
  • Once the dough is smooth, tur into a butter bowl, cover and leave to prove. you want it to be doubled in size. Either leave the dough in the fridge overnight or in a warm place for an hour or so.
  • Once doubled in size, punch the air out the dough, a useful de-stressing exercise, knead for a minute and shape into whatever shape you like. I prefer a longer, thinner loaf as its easier to slice.
  • Sit on a baking tray and cover loosely with a tea towel for about 30mins until the bread is aerated again and almost doubled in size, in the meantime, preheat the oven to 200C.
  • Once puffy, bake the bread for a bout 30mins until brown.
  • To test whether the bread is cooked, tap the bottom of the bread and it should sound hollow.
  • Sneak a little slice whilst the bread is still warm, slather with butter, eat and feel smug at your breadmaking skills
Bookmark and Share

Simple Chickpea Stew

October 6th, 2008

CIMG1689
This is simplicity itself. I wanted something vaguely healthy (chickpeas count as a portion of your 5-a-day) that was comforting, ideally eaten from a bowl with enough sauce to soak into some carbohydrate, my choice being couscous. A dollop of yoghurt on top (I love yoghurt) and you’re away.

This is basically, onions, garlic chilli, paprika, ground coriander and chickpeas simmered with chopped tomatoes for about 20mins and that’s it! I like to always have chopped parsley around and its a nice contrast of green, but definitely not necessary, it also occurred to me that some toasted flaked almonds might add some texture, maybe next time.

Ingredients

Serves 4

2 onions, diced (or sliced if you prefer)
4 cloves garlic finely chopped
1 chilli, finely chopped
1tsp smoked paprika
2tsp ground coriander
½tsp vegetable stock powder (bouillon), optional
2 cans chickpeas, drained
1 can chopped tomatoes

  • Fry the onions, garlic and chilli over a low heat for 5-10mins until the onions are completely soft.
  • Stir in the spices and fry until they release their pungent aroma.
  • Pour in the chickpeas and stir well so that each chickpea is coated in the spice mixture
  • Add the tomatoes. fill the empty can about half way with water, swill and pour into the pan.
  • Add the bouillon powder and stir. Allow the mixture to simmer happily for about 15mins, after which taste and check for seasoning. You may need to add a little bit more water and/or paprika and ground coriander.
  • Serve with couscous, yoghurt, and chopped parsley.
Bookmark and Share

Mexican Breakfast

September 29th, 2008

CIMG1598

As with most things I make, this isn’t exactly authentic, but who cares when it tastes this good. And it did, believe me. This is a kind melding together of all things vaguely Mexican that I know of, initially inspired by this recipe from BBC Good Food, I made the spicy bean mixture, topped with cheese and grilled until bubbling and golden, on top came a fried egg, a spoon of tomato salsa, a handful of diced avocado and a splodge of greek yoghurt (in the absence of sour cream).

CIMG1596

I would go so far as to say that this is almost healthy, plenty of beany protein and a hefty dose from the egg too, a couple of portions of veg and good fats from the avocado, all that colour is definitely good for you. This is a weekend breakfast though, you need a few hours reading the paper with a cup of tea to let it all digest. Then maybe another for lunch?

Breakfast Tostada

Serves 2

1 400g can refried beans
1 200g can kidney beans, drained
2 large flour tortillas
50g cheddar grated
1 green chilli , thinly sliced
2-4 free range eggs
3 ripe tomatoes, diced
½ red onion, diced
½ lime
½ avocado, diced
4tbsp sour cream or greek yoghurt

  • Mix the tomatoes, red onion and lime juice together and season well.
  • Mix the re-fried beans with the kidney beans and ½ the chilli, check if it needs extra seasoning.
  • This makes a lot of bean mixture, leftovers will keep in the fridge for a few days or freeze well.
  • Spread a thin layer over the torillas, sprinkle with the cheese and remaining chilli and grill until the cheese is bubling and the tortilla crisp.
  • Meanwhile heat about 1tbsp oil in a and fry the eggs to your preference. 1 or 2 each depending on how greedy you’re feeling.
  • Once the tostadas are cooked, top with the fried egg, a spoonful of salsa, some avocado and a dollop of sour cream.
Bookmark and Share

Split Pea Soup

September 25th, 2008

CIMG1647

I’m a big fan of pulses. They’re cheap as chips and count as one of your 5-a-day, hurray! Recently, as our unspectacular summer grinds to an end, I’ve been hankering after soup and when I think of soup, split pea soup is one of the first to spring to mind.

The only version I’ve ever made is from the fabulous Cranks, split pea soup flavoured with some aromatic cumin, with fried mushrooms and spinach stirred in at the end, dolloped with limey yoghurt. Make this once and you will see why I’ve never veered from it before.

Whilst contemplating the soup however, I did a little recipe browsing and have since found that you can do pretty much whatever you fancy to the soup, here’s a very basic recipe, and one with olives and raita added on top, I’ve bookmarked this version for next time.

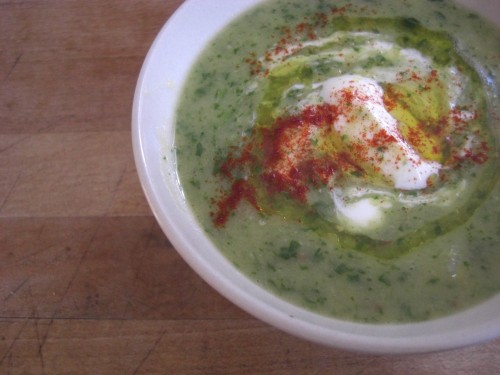
In the end I started out sticking to the Cranks version, but decided to blend in the spinach at the end, do away with the mushrooms and lime and just add a spoon of yoghurt, some peppery olive oil and some paprika for smoky depth.

As with most soups, this is perfect for making in a big old pot and freezing leftovers. I made half the below amount and it was all gone disappointingly fast. Being at home all weekend, means there are plenty of opportunities to heat up a little bowl for a snack…

Ingredients

Makes 6-8 portions

500g split peas (yellow or green depending on your colour preference)
1 onion, chopped
2 cloves garlic, chopped
1 red chilli, chopped
1tbsp cumin seeds (ground cumin will do)
1.5litres hot vegetable stock
100g spinach
250g yoghurt
smoked paprika to serve

  • Pour the split peas into a large bowl, cover with twice the volume of water and leave overnight to soak.
  • The next day… Fry the onions with a little in large saucepan over a medium heat. Once softened, add the chilli, garlic and cumin, sizzle for a few minutes more.
  • Drian the split peas and rinse, tip them into the pan with the onions and stir well to coat in the aromatic oil.
  • Pour in the hot vegetable stock and allow it to boil vigorously for about 10mins, scraping off the frothy scum that rises to the surface.
  • Turn the heat down and simmer for about 30mins until the peas collapse.
  • Add the spinach to the pan, cover and let it wilt in the pan.
  • Once the spinach is wilted, use a hand blender to blend the soup until smooth, be careful not to overblend, you still want flecks of green against the yellow background. Taste and add salt and pepper to taste.
  • Serve with a big dollop of yoghurt, a drizzle of oil and a sprinkling of paprika.
Bookmark and Share